OW2-Customizable-Aim-Trainer
A Super Customizable Aim Trainer
Features
- ==Projectile guide== - Learn to lead projectiles
- ==Pressure mode== - Bots shoot back with customizable accuracy
- ==Custom spawn location== - Train on any location on any map. Multiple spawn bots for bots.
- ==Reactive bots== - Bots will react to your actions
- ==Customizable movement== - Configure strafe pattern, frequency, and movement speed
- ==In-game menu== - Make small adjustments to your game quickly without need to restart the mode.
- ==Offensive, defensive, and ultimate ability usage for nearly every hero.==
In-Game Menu
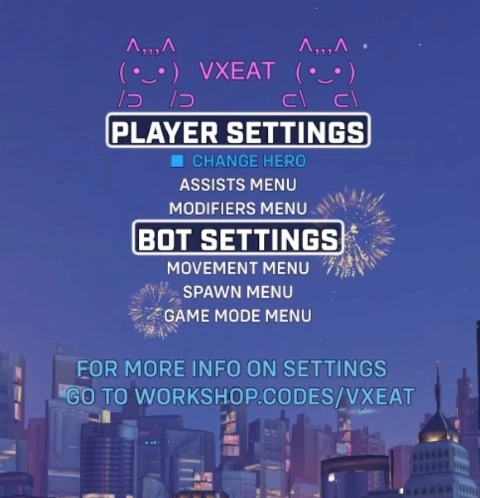
Player Settings
These settings are available to all players in the lobby.
| Menu Option | Description |
|---|---|
| ==Change Hero== | Return to hero select screen. |
Player Assists
| Menu Option | Description | | ——– | ——– | | ==Projectile Guide== | Cycle through abilities to display an orb showing where to lead the ability projectile, based on the bots current velocity. | | ==Mercy Damage Boost== | Toggles Mercy’s damage boost effect on the player. | | ==Nano Boost== | Toggles Ana’s nano boost effect on the player. Inaccurate damage reduction when stacking DR abilities. | | ==Kitsune Rush== | Toggles Kiriko’s kitsune rush. Refreshes until disabled. |
Player Modifiers
| Menu Option | Description | | ——– | ——– | | ==Player Movement Speed== | Cycle through speed boost effects to be applied to the player. | | ==Infinite Ammo== | Toggle for max ammo. Will insta-reload at 1 ammo.| | ==No Strafe Stun== | Stuns the player if they have not changed strafe directions in the selected number of seconds. Cycle through time before being stunned. Corse and find grain control. |
Bot Settings
These settings are only avalaible to the host.
Bot Movement
| Menu Option | Description | | ——– | ——– | | ==Bot Strafe Pattern== | Cycle through different strafe patterns. | | ==Min Distance (Hidden)== | Cycle through the minimum distance bots can path near you when using the custom distance strafe option. | | ==Max Distance (Hidden)== | Cycle through the maximum distance bots can path away from you when using the custom distance strafe option. | | ==Fixed Points (Hidden)== | Cycle through the number of points on a circle bots path to when using the fixed shapes strafe option. | | ==Bot Strafe Difficulty== | Cycle through difficulty options that change the frequency at which bots change strafe directions. | | ==Min Strafe Wait (Hidden)== | The minimum time to wait before bots have a chance at change strafe directions when using the custom strafe difficulty. | | ==Max Strafe Wait (Hidden)== | The maximum time to wait before bots have a chance at change strafe directions when using the custom strafe difficulty. | | ==Bot Strafe Speed== | Cycle through speed boost effects to be applied to bot. | | ==Bouncing Bots== | Cycle through the magnitude of impulse applied to bots when they are on the ground. |
Bot Spawn
| Menu Option | Description | | ——– | ——– | | ==Number of Bots== | Cycle the number of bots to spawn, up to 12. | | ==Spawn Type== | Toggle between having bots spawn withw the same position, radius and hero pool, or letting each bot have their own custom spawn variables. | | ==Bot Slot (Hidden)== | The slot of the bot you would like to configure when using the multipoint spawn mode. Starts at 0. | | ==Hero Pool / Slot X Hero Pool== | The hero pool for the bots. If in multipoint mode, the hero pool will be specific to the bot at the set slot. | | ==Spawn Radius / Slot X Spawn Radius== | Cycle the radius of the area that the bots can spawn in. Affects the pathing for the default and long-strafe settings. | | ==Set Spawn Point / Set Slot X Spawn Point== | Sets the spawn location of the bot / bot in slot X. |
Game Modes
| Menu Option | Description |
|---|---|
| ==Pressure Mode== | Cycle to start a game mode where the bot closest to your crosshair will attack you, if in line of sight. And additional mode is avaible where the bots are immortal. Additional stats will be added to the top left HUD. |
| ==Pressure Accuracy (Hidden)== | Cycle how likely the bot will aim direct at you, and if the bot is going to miss, how narrow of a margin that the miss is. |
| ==Speed Mode== | Causes the bot’s movement speed to increase after every elimination. |
| ==Speed Timer (Hidden)== | Cycle the time to wait before decrementing the speed multiplier. The timer resets to this value after every elimination. |
| ==Increment Step (Hidden)== | Cycle the amount of speed percentage to add after every elimination. |
| ==Decrement Step (Hidden)== | Cycle the amount of speed percentage to remove after the timer runs out. |
Controls
PC Controls
| Button | Action |
|---|---|
| ==Ability 2== | Select menu item. |
| ==Forward== | Move up one on the menu. |
| ==Backward== | Move down one on the menu. |
| ==Left / Right== | Cycle the selected menu item. Allows for fine grain control on certain menu options. |
| ==Ultimate / Ability 2== | Cycle the selected menu item. Allows for corse control on certain menu options. |
Console Controls
| Button | Action |
|---|---|
| ==Ability 2== | Select menu item. |
| ==Ultimate== | Move up one on the menu. |
| ==Jump== | Move down one on the menu. |
| ==Ability 1 / Ability 2== | Cycle the selected menu item. Allows for fine grain control on certain menu options. |
| ==Secondary Fire / Primary Fire== | Cycle the selected menu item. Allows for corse control on certain menu options. |
Feature Tutorials
Custom Aim Training Location
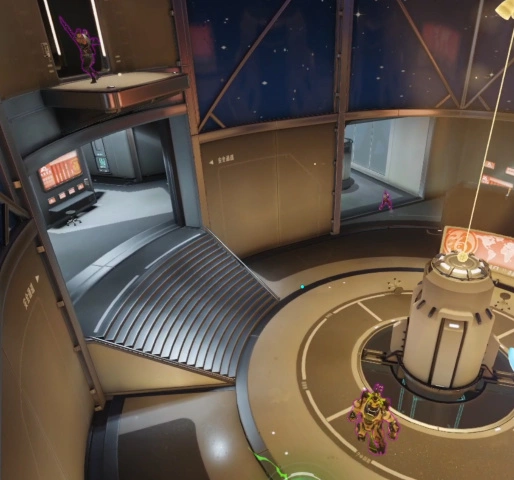
Single Point Spawn
- Import this code into a custom game lobby.
- Select the map tile in the custom game settings menu.
- Scroll to the map you wish to practice on, and toggle the off button to on. To select a specific point on a control map return to the settings menu, select the modes tile, then the skirmish tile, then assign “Limit Valid Control Points” to the point you would like to practice on.
- Start the game mode.
- Select a hero.
- Navigate to the center location where you would like your bots to spawn.
- Press Interact to open up the menu.
- Scroll down the until ==Open Spawn Menu== and select it.
- Scroll down to ==Set Spawn Point== and select it.
- Press Interact to close the menu.
- The bots will now respawn at the location you have assigned.
- You can change the radius of the spawn area by scrolling up and selecting cycling through the distance.
Multipoint Spawn
You can also set bots to have unique spawn points, radii, and hero pools for each slot.
- Import this code into a custom game lobby.
- Select the map tile in the custom game settings menu.
- Scroll to the map you wish to practice on, and toggle the off button to on. To select a specific point on a control map return to the settings menu, select the modes tile, then the skirmish tile, then assign “Limit Valid Control Points” to the point you would like to practice on.
- Start the game mode.
- Select a hero.
- Navigate to the center location where you would like your bots to spawn.
- Press Interact to open up the menu.
- Scroll down the until ==Open Spawn Menu== and select it.
- Scroll down to ==Spawn Type== and select it. It should say ==Multipoint Spawn==.
- A new menu option ==Bot Slot== will appear. Use this to select which bot you would like to configure.
- Configure the hero pool, spawn radius, and spawn point for the bot at the slot you selected.
- Repeat steps 10 and 11 for each bot in the lobby.
- Press Interact to close the menu.
- The bots will now respawn at the location you have assigned.
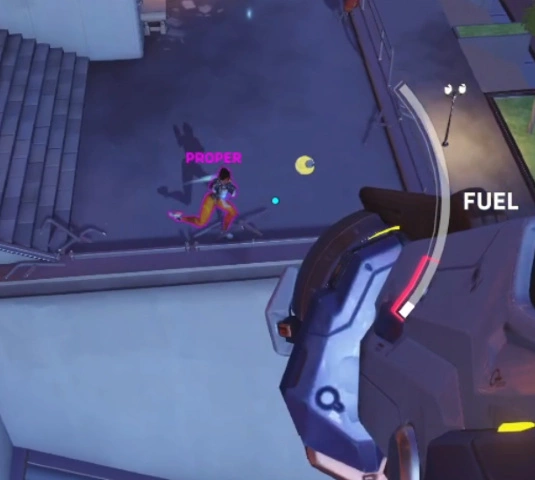
Leading Target for Projectile Abilities
- Import this code into a custom game lobby.
- Start the game mode.
- Select a hero.
- Press Interact to open up the menu.
- Scroll down the menu until ==Open Assists Menu== is highlighted and select it.
- Scroll down until ==Projectile Guide== is highlighted and use cycle to select which ability you would like to practice. If the text is highlighted green, then the selected ability is a projectile for your hero, and the the speed of the projectile will be displayed. If the text is highlighted red, the selected ability is not a projectile for the hero you selected.
- Press Interact to close the menu.
- A black dot outlined by a yellow orb should now appear near the target closest to your crosshair. Aiming for the black dot will result in a hit, assuming the target does not change the direction it is strafing.
- Note: The target aims for the targets camera, which may slightly different from the targets crit box.
- Bug: The target is slightly too low for arcing projectiles at ranges greater than 20 meters.
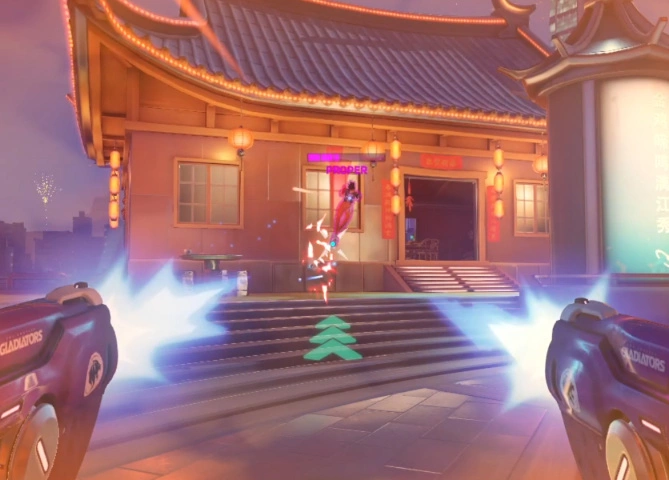
Bots Shoot at You During Training (Pressure Mode)
- Import this code into a custom game lobby.
- Start the game mode.
- Select a hero.
- Press Interact to open up the menu.
- Scroll down until ==Game Modes== is highlighted.
- Scroll down the menu until ==Pressure Mode== is highlighted.
- Toggle this setting on. Toggle again to make the bots unkillable.
- Scroll down to pressure accuracy and cycle through to select how accurate the bots are. The difficulty level scales exponetially.
- All heroes will read your movement and when aiming, and have a higher likelyhood of overshooting than undershooting.
- Projectile heroes will lead their shots when aiming for you.
- Bots will use offensive abilities if the setting “Use Abilities” is set to true under the ==Bot Movement== menu option.
- Bots will use react to your input if ==Bots React== is set to on in the workshop settings menu.
- Bots will use defensive abilities and ultimates if enabled in under the setting 8.x. in the workshop settings menu.
- By default this code has no cooldowns for abilities. If you want to use this setting I recommend setting under ‘Heroes -> General -> Ability Cooldown Time’ to 100% so that your cooldown timers will be similar to an actual game.
- Also note that Echo’s flight and Doomfist’s slam are set to 10% by default because of a weird interaction when canceling these abilties with 0% cooldowns. If practicing these heroes go to ‘Heroes -> Doomfist / Echo-> Seismic Slam Cooldown Time / Flight Cooldown Time’ and set them to 100%
Workshop Settings Menu
UI Settings
| Setting | Description | | ——– | ——– | | ==Show HUD (Enable to allow for player settings for a second player)== | Toggle to text that appears when the menu is off. | | ==Console UI== | A toggle to switch the UI configured for console. | | ==Show Damage Numbers== | Show Damage Numbers above the targeted bots head. | | ==Show Server Load and Coordinates== | Shows the server load and the player’s current coordinates. Useful for getting the numbers for the Custom Bot Spawn setting. |
Number of Bot Setting
| Setting | Description | | ——– | ——– | | ==Number of Bots== | The default number of bots that will spawn when you start the game mode. |
Bot Ability Settings
| Setting | Description | | ——– | ——– | | ==Bots will use abilities== | Toggle for bots to use abilities. | | ==Bots React== | Bots will read the players input and have a chance of using their own abilities in response. | | ==Multiplier for Bots React== | Modifies how likely bots will use their abilities in response to thei player’s input | | ==Multiplier for Bot Abilities== | Modifies how often bots their abilities. | | ==Multiplier for Bot Ultimates== | Modifies how often bots use their ultimates. The default is a 30% chance every 10 seconds for most bots. |
Bot Movement Settings
| Setting | Description | | ——– | ——– | | ==Strafe Pattern== | The type of strafe pattern you would like bots to use. | | ==Difficulty== | How often bots swap strafe directions. | | ==Bot Movement Speed== | Lets you change the movement speed for the bots, as if they were under the effect of one of the abilities in the list. |
Bot Movement Modifiers Settings
| Setting | Description | | ——– | ——– | | ==Bot Jumping== | Toggle for bots to randomly jump. | | ==Bot Jumping - Minimum Wait== | The min time for a bot to wait before jumping. | | ==Bot Jumping - Maximum Wait== | The max time for a bot to wait before jumping. | | ==Bot Crouching== | Toggle for bots to randomly jump. | | ==Bot Crouching - Minimum Wait== | The min time for a bot to wait before crouching. | | ==Bot Crouching - Maximum Wait== | The max time for a bot to wait before crouching. | | ==Bot Uncrouching - Minimum Wait== | The min time for a bot to wait before uncrouching. | | ==Bot Uncrouching - Maximum Wait== | The max time for a bot to wait before uncrouching. | | ==Custom Strafe Pattern - Minimum Wait== | The min time for a bot to wait before changing direction in the ‘long strafe / custom’ difficulty. | | ==Custom Strafe Pattern - Maximum Wait== | The max time for a bot to wait before changing direction in the ‘long strafe / custom’ difficulty. | | ==Custom Distance Minimum Distance== | The closest bots are allowed near the player with the Custom Distance pattern. Can be bugged by map geometry. | | ==Custom Distance Maximum Distance== | The farthest bots are allowed away from the player with the Custom Distance pattern. Can be bugged by map geometry. | | ==Fixed Shapes Points== | The number of points bots should path for the fixed shapes movement options. | | ==Bouncing Bots== | The magnitude for bots to bounce when on the ground. 0 = off. |
Pressure Mode Settings
| Setting | Description | | ——– | ——– | | ==Bots Apply Pressure== | A toggle for the pressure mode to be enabled when starting the game mode | | ==Bots Pressure Accuracy== | The accuracy of the bots applying pressure. Accuracy determines the chance a bot has to shot directly at the player’s eye level. If the bot is supposed to miss, accuracy determines the degree of error the bot makes based off the player’s movement. Difficulty sales exponentially. |
Pressure Mode Modifier Settings
| Setting | Description | | ——– | ——– | | ==Eliminations Reset Cooldowns== | Killing a bot will restore your health and reset all of your cooldowns, if supported by the workshop. Makes practicing 1v1s more fair. | | ==Reset Health After Not Taking Damage== | Resets your health to full after not taking damage for 4 second in the killable bots pressure mode. | | ==Punish Player Deaths== | The player is stunned for 0.5 seconds and the attacker is healed to full when the player dies in the killable bots pressure mode. |
Speed Mode Settings
| Setting | Description | | ——– | ——– | | ==Increment Bot Movement Speed Every Elimination (JPYHG)== | A to increase bot movement speed after every elimination, similar to ioStux’s DPO Aim Trainer | | ==Speed Mode Timer== | How long to wait before going down a level. | | ==Speed Mode Base Speed== | The starting and lowest speed possible for speed mode. | | ==Speed Mode Increment Percent Amount== | The percent amount to increase bot speed after an elimination. | | ==Speed Mode Decrement Percent Amount== | The percent amount to decrease bot speed after failing to achieve an elimination within the time limit. |
Custom Spawn Settings
| Setting | Description | | ——– | ——– | | ==Use Custom Spawn Point== | A toggle to use the default spawn settings or customized spawn settings. | | ==Spawn Size== | The custom radius bots attempt to traverse. | | ==Spawn x coord== | The x coordinate of the custom spawn location. | | ==Spawn y coord== | The y coordinate of the custom spawn location. | | ==Spawn z coord== | The z coordinate of the custom spawn location. |
Bot Tank Heroes Settings
- Toggles for all Tank heroes to be included in the hero pool when first starting up
Bot Damage Heroes Settings
- Toggles for all Damage heroes to be included in the hero pool when first starting up
Bot Support Heroes Settings
- Toggles for all Support heroes to be included in the hero pool when first starting up
Bot Behavior Settings
| Setting | Description | | ——– | ——– | | ==Enable All Abilities== | Enables all bot abilities and ultimates regardless of what they are set to in the menu. |
Bot Tank Hero Behavior Settings
- Menus to select which abilities should be enabled for every tank hero. Defensive abilities and ultimates disabled by default.
Bot Damage Hero Behavior Settings
- Menus to select which abilities should be enabled for every damage hero. Defensive abilities and ultimates disabled by default.
Bot Support Hero Behavior Settings
- Menus to select which abilities should be enabled for every support hero. Defensive abilities and ultimates disabled by default.
Misc. Functions
- When not using pressure mode Zarya will generate charge when using her personal bubble.
- When not using pressure mode and facing a bot, Doomfist will generate charge for his power block.
Bot Strafe Pattern Explaination
| Setting | Description | | ——– | ——– | | ==Random== | Randomly cycles between the next 4 options. | | ==Seita== | A recreation of the movement seen in vaxta, adapted to work with custom spawn points. | | ==Seita w/ long strafes== | The same as above, but every time the bots swap strafe directions there is a 20% chance that the bots strafe for longer than the difficulty setting assigned. The idea is to mess with your ability to predict when the bot is going to swap strafe directions. | | ==AD Strafes== | Classic ADAD spam. Ignores the boundaries set by the custom strafe option. | ==Custom Distance== | Similar to Seita’s Pathing, except bots will simply input 1 one the 8 possible strafe directions. Allows you to set a minimum and maximum range for bots to path between. Ignores the boundaries set by the custom strafe option. | | ==Fixed Shapes== | Bots will path between a number of points on a circle. Allows you to set the number of points up to 100. | | ==No Movement== | Bots don’t move. They will still jump, crouch and use abilities if enabled. | | ==Forward AD Strafes== | Bots AD strafe towards a player. I don’t recommend this setting for general practice but the code for it is used for certain bot abilities so I thought I might as well leave it as an option if someone might have a specific senario they want to practice. Ignores the boundaries set by the custom strafe option. | | ==Forward Movement== | Same as above, except the bots just press W key. |
Discord
- Report bugs on my discord: discord.gg/YPQ5ETNT45
Github
- Workshop mode created with OverPy
- You can find the script to compile the workshop mode yourself here: https://github.com/a-bella-ciao/VXEAT-OW2-Aim-Trainer
Credits